

みゆき
-
Posts
134 -
Joined
-
Days Won
16
Posts posted by みゆき
-
-
nein, die von Froxlor zb. oder einer anderen domain. kA jetzt ob die für apache auch 35_froxlor_ssl_vhost_domain.tld.conf heißen.
-
die wo Froxlor erstellt hat, also sites-enable
-
Zeige mal Bitte die komplette vhost datei. Da ich bezweifel, das LE aktiviert ist bzw. der Cronjob dafür durch gelaufen ist.
-
wurde der webserver nach dem erstellen der LE Certs neu gestatert bzw. noch mal den cronjob manuel starten, dann sollte es passen.
-
Du kannst dein Selbst erstellstes Cert in => SSL-Einstellungen > Pfad zum SSL-Zertifikat und deine Key Datei in > Pfad zum SSL Private-Key eintragen inkl. Pfad
-
hier steht schon der fehler:
Mai 10 17:52:32 root.DOMAIN.TLD proftpd[25520]: Starting ftp server: proftpd2019-05-10 17:52:32,954 root.DOMAIN.TLD proftpd[25528]: warning: unable to determine IP address of 'root.DOMAIN.TLD' Mai 10 17:52:32 root.DOMAIN.TLD proftpd[25520]: 2019-05-10 17:52:32,955 root.DOMAIN.TLD proftpd[25528]: error: no valid servers configured Mai 10 17:52:32 root.DOMAIN.TLD proftpd[25520]: 2019-05-10 17:52:32,955 root.DOMAIN.TLD proftpd[25528]: fatal: error processing configuration file '/etc/proftpd/proftpd.conf' Mai 10 17:52:32 root.DOMAIN.TLD proftpd[25520]: failed! -
2 hours ago, xep22 said:
oder anders gefragt, wie soll man denn normalerweise lets encrypt automatisch generieren lassen ? SSL in froxlor aktivieren, und dann ? gibts irgendwo eine doku/anleitungen ?
Ja, einfach SSL in den Optionen aktivieren und LE aktivieren und den rest macht dann Froxlor selbst, nach dem der Cron gelaufen ist.
SSL-Einstellungen
Für Optimale SSL TLS settings für Apache2 oder Nginx Webserver => https://mozilla.github.io/server-side-tls/ssl-config-generator/
Pfad zu acme.conf => Bei Apache "/etc/apache2/acme.conf | Bei Nginx "/etc/nginx/acme.conf"acme.conf
Alias "/.well-known/acme-challenge" "/var/www/html/Froxlor/.well-known/acme-challenge"
<Directory "/var/www/html/Froxlor/.well-known/acme-challenge">
    Require all granted
</Directory>
Optional:
Schlüsselgröße für neue Let's Encrypt Zertifikate => 4096 oder 8192
ECC / ECDSA Zertifikate ausstellen => ec-384Froxlor VirtualHost Einstellungen
Let's Encrypt für den froxlor Vhost verwenden => Ja
SSL-Weiterleitung für den froxlor Vhost aktivieren => Ja
HTTP Strict Transport Security (HSTS) => 31536000 -
Habe mit deinem Anbieter Telefoniert, auf den Cloud-Servern ist ein stink normales Debian Jessie installiert mit den Standard Settings, auch der Nano Befehl oh. Probleme, auch eine Source.list ist vorhanden usw.
Du hast auch vollen Root Zugriff auf die Kiste, also kA genau was du da gemacht hast.Wenn du noch nichts wichtiges auf dem Server drauf hast, mache einen Re-Install von Debian Jesse und fange ganz von vorne Bitte an.
Du kannst dir dann Froxlor wieder installieren, wie dies dann geht findest du hier > https://github.com/Froxlor/Froxlor/wiki/Install-froxlor-on-debian
Die Paketabhängikteien, wie Apache2 usw. werden dann automatisch mit Installiert, wenn du dies nach nach der Oben genannten Anletiung machst.Wenn du Probleme hast, wende dich auch an deinen Hoster, er Hilft dir auch
-
6 minutes ago, lprod said:
Wie zu erwarten:
Absolut blanco.
Ok, von so einem Debian hab ich noch nie was gehört im Leben. Ich frag mal morgen deinen Anbieter mal per Tele, was die da genau benutzen, das interessiert mich selbst sehr.
-
Rufe pls mal die Source.list mit nano oder einen anderen ssh Editor auf und Poste diese hier mal.
also mit nano /etc/apt/source.list
-
14 minutes ago, lprod said:
Macht es Sinn, eine Neuinstallation mit Plesk laufen zu lassen und dann froxlor drüber zu setzen?
Dann dürften die Standardprogramme ja wohl laufen. Nein, das macht mehr kaputt dann, als es was bringt.
Welche Service hast du in Anspruch genommen bei dogado, bzw. ist das überhaupt ein Dedicated Server oder eher ein V-Server etc? -
Ich tippe auf eine Debian Minimal Installation.
@Iprod
Du hast jetzt mehere möglichkeiten, entweder installiert du Manuel, alle Standard Sachen nach, wie Nano und co.
Dafür gibt es viele, How To's im Web, oder du installiert Debian neu, bsp direkt Stretch und Webserver (manche Anbieter), haben dafür vorgefertigte Templates.
Aber auf jedenfall solltest du die Basic's noch lernen für Linux. -
3 minutes ago, lprod said:
Der Ordner existiert nicht ...
Dann hast du wohl Dovecot nicht richtig installiert.
apt remove --purge dovecot-imapd dovecot-pop3d dovecot-mysql dovecot-managesieved dovecot-sieve
apt install dovecot dovecot-imapd dovecot-pop3d dovecot-mysql dovecot-managesieved dovecot-sieveWelches OS ist eig. auf dem Server installiert?
-
Die Fehlermeldung sagt ja eig. schon alles, das eine dovecot.conf nicht vorhanden ist. entweder hast du diese vorher schon in eine .bak umbenannt.
Schau doch mal im Dovecot Verz. selbst nach.
cd /etc/dovecot
ls -ladrwxr-xr-x 4 root root 4096 Feb 21 09:01 . drwxr-xr-x 154 root root 12288 Mar 16 22:43 .. drwxr-xr-x 2 root root 4096 Feb 21 14:54 conf.d -rw-r--r-- 1 root root 4398 Feb 21 09:01 dovecot.conf -rw-r--r-- 1 root root 4597 Feb 20 09:30 dovecot.conf.frx.bak -rw------- 1 root root 6360 Feb 21 09:01 dovecot-sql.conf.ext -rw------- 1 root root 6360 Feb 19 17:43 dovecot-sql.conf.ext.frx.bak drwx------ 2 root root 4096 Jan 28 14:49 private -
apt install nano
das mit php /var/www/html/Froxlor/install/scripts/config-services.php --froxlor-dir=/var/www/html/Froxlor/ --create
ist der Standard Pfad für Froxlor, wenn du natürlich Froxlor unter einen anderen Pfad installiert hast, die zeile anpassen.Ich empfehle dir, erst mal die Basic's von Linux zu lernen bevor du einen Server Produktiv einsetzt, erspart dir menge Ärger.
Desweiteren setze auf PHP7.x und nicht auf PHP5.x da letzteres EOL ist. -
einfach nur nano /etc/proftpd/create-cert.sh
alternativ: php /var/www/html/Froxlor/install/scripts/config-services.php --froxlor-dir=/var/www/html/Froxlor/ --create
das install script erstellt dir alle confs selbst. daher brauchst dann keine copy&paste mehr machen.
-
sudo adduser jewelry --disabled-password --no-create-home && sudo usermod -a -G www-data jewelry && service php7.3-fpm restart-
 1
1
-
-
Anleitung überarbeitet
Änderungen
- Ubuntu Arful > Ubuntu Cosmic
- Struktur geändertInstructions change
Change
- Ubuntu Arful > Ubuntu Cosmic
- Structure changed -
On 8.1.2018 at 10:48 AM, MaT said:
"vhost frox löschen", meine ich in Bezug auf das HowTO oben - da ist das ja ein Schritt im Ablauf - ich habe den vhost jetzt wieder erstellt derzeit, um das Froxlor Panel zu haben
Der Manuelle Frox vhost ist nur dazu da, weil ich froxlor ausserhalb des html verz. betreibe, sonst kann nginx nicht darauf zugreifen. Normal ist es so, wenn du Froxlor installiert hast und danach den angelegten Vhost wieder löscht, weil Froxlor selbst einen Vhost ja anlegt, sobald der Cron neu startet.
Schau mal in den ordner von nginx /etc/nginx/site-enable/ ob da Froxlor datein vorhanden sind, wenn nicht checke mal deinen cronjob.
-
11 hours ago, lino16 said:
@irisdina: Danke für deine TOP Anleitung. Ich habe das Howto unter Ubuntu 17.10 (Artful) installiert.
Ich habe noch folgende Anmerkungen:
2a. MariaDB 10.1 Workround (Optional) sollte nicht nur Debian, sondern auch Ubuntu 17.10 stehen, da ich dies auch brauchte.
PHP-FPM activate
2. libnss-extrausers install (hier fehlt apt)
sudo install nscd libnss-extrausers
Nach der Konfiguration von PHP-FPM nach der Anleitung kam immer der Gateway Fehler 502.
Das konnte ich mit folgendem Befehl lösen:
usermod -a -G www-data froxlorlocal
Wenn du es zu 100% nach dem Howto gemacht hast, sollte dies nicht auftreten mit MariaDB, da bei der Ubu Anleitung die 10.2 drin ist.
Das mit dem error 502 passiert eigentlich nur, wenn man vergisst den Froxlor ordner die rechte vorher von www-data zu geben, dann passiert dies.Habe die zwei anmerkungen ins Howto aufgenommen, danke.
-
Howto komplett überarbeitet.
hinzugekommen:- Ubuntu Artful
- PHP-FPM
- SSL -
12 hours ago, J-B said:
Was spricht denn gegen die MariaDB von Debian Stretch?
In den Alten Versionen gab es ein Problem/Bug/Feature, dass man kein PW ändern konnte bzw. bei dem Install setzen konnte und später erst nervig ein PW einstellen konnte.
2 hours ago, d00p said:seitens froxlor selbst nix
")
will man doch hoffen, das Froxlor nichts dagegen hat
-
Warning, this is not an official guide!!!
1.
sudo mv /etc/apt/source.list /etc/apt/source.list.bak1a. Create new Source.list
sudo nano /etc/apt/source.list1b. insert (for Debian Stretch)
Spoiler###### Debian Main Repos
deb http://ftp.de.debian.org/debian/ stable main contrib non-free
deb-src http://ftp.de.debian.org/debian/ stable main contrib non-free
deb http://ftp.de.debian.org/debian/ stable-updates main contrib non-free
deb-src http://ftp.de.debian.org/debian/ stable-updates main contrib non-free
deb http://security.debian.org/ stable/updates main
deb-src http://security.debian.org/ stable/updates main
deb http://ftp.debian.org/debian stretch-backports main
deb-src http://ftp.debian.org/debian stretch-backports main###### Extra Repos
###Debian Multimedia
deb [arch=i386,amd64] http://www.deb-multimedia.org stretch main non-free###nginx
deb [arch=amd64,i386] http://nginx.org/packages/debian/ stretch nginx
deb-src [arch=amd64,i386] http://nginx.org/packages/debian/ stretch nginx###php7.X | curl https://packages.sury.org/php/apt.gpg | apt-key add -
deb https://packages.sury.org/php/ $(lsb_release -sc) main### MariaDB 10.3
### http://downloads.mariadb.org/mariadb/repositories/
deb [arch=amd64,i386,ppc64el] http://ftp.hosteurope.de/mirror/mariadb.org/repo/10.3/debian stretch main
deb-src http://ftp.hosteurope.de/mirror/mariadb.org/repo/10.3/debian stretch main1.2B (for Ubuntu Cosmic)
Spoiler###### Ubuntu Main Repos
deb http://de.archive.ubuntu.com/ubuntu/ cosmic main restricted universe multiverse
deb-src http://de.archive.ubuntu.com/ubuntu/ cosmic main restricted universe multiverse###### Ubuntu Update Repos
deb http://de.archive.ubuntu.com/ubuntu/ cosmic-security main restricted universe multiverse
deb http://de.archive.ubuntu.com/ubuntu/ cosmic-updates main restricted universe multiverse
deb http://de.archive.ubuntu.com/ubuntu/ cosmic-proposed main restricted universe multiverse
deb http://de.archive.ubuntu.com/ubuntu/ cosmic-backports main restricted universe multiverse
deb-src http://de.archive.ubuntu.com/ubuntu/ cosmic-security main restricted universe multiverse
deb-src http://de.archive.ubuntu.com/ubuntu/ cosmic-updates main restricted universe multiverse
deb-src http://de.archive.ubuntu.com/ubuntu/ cosmic-proposed main restricted universe multiverse
deb-src http://de.archive.ubuntu.com/ubuntu/ cosmic-backports main restricted universe multiverse###### MariaDB 10.3 repository list - created 2019-01-25 21:01 UTC
###### http://downloads.mariadb.org/mariadb/repositories/
deb [arch=amd64] http://ftp.hosteurope.de/mirror/mariadb.org/repo/10.3/ubuntu cosmic main
deb-src http://ftp.hosteurope.de/mirror/mariadb.org/repo/10.3/ubuntu cosmic main###### Nginx Mainline
###### https://launchpad.net/~nginx/+archive/ubuntu/development
deb http://ppa.launchpad.net/nginx/development/ubuntu cosmic main
deb-src http://ppa.launchpad.net/nginx/development/ubuntu cosmic main###### PHP7.X
###### https://launchpad.net/~ondrej/+archive/ubuntu/php
deb http://ppa.launchpad.net/ondrej/php/ubuntu cosmic main
deb-src http://ppa.launchpad.net/ondrej/php/ubuntu cosmic main
1c.
sudo apt update && sudo apt dist-upgrade && sudo apt autoclean && sudo apt autoremove1d.
sudo apt install curl wget apt-transport-https dirmngr git software-properties-commonNow you can start setting up your server
2. MariaDB install
Warning use sudo command für this install!sudo apt install mariadb-server mariadb-client
2a. MariaDB 10.3 Workround (Optional)
Spoilerwhen you MariaDB install with not sudo command, have you Problems with your Froxlor install.
you can use this workround: (Thanks J-BBB for this Note") )
)
mysql -u root
MariaDB [(none)]> update mysql.user set password=password('your PASS') where user='root';
MariaDB [(none)]> update mysql.user set plugin='' where user='root';
MariaDB [(none)]> flush privileges;
3. nginx install
sudo apt install nginx3a.
mkdir /etc/nginx/sites-available mkdir /etc/nginx/sites-enabled3b. nano /etc/nginx/nginx.conf
Spoileruser www-data;
worker_processes auto;
pid /run/nginx.pid;
include /etc/nginx/modules-enabled/*.conf;events {
worker_connections 768;
multi_accept on;
}http {
##
# Basic Settings
##sendfile on;
tcp_nopush on;
tcp_nodelay on;
keepalive_timeout 65;
server_tokens off;# server_names_hash_bucket_size 64;
# server_name_in_redirect off;include /etc/nginx/mime.types;
#include /etc/nginx/naxsi.rules;
#include /etc/nginx/naxsi-wp.rules;
default_type application/octet-stream;##
# SSL Settings
##ssl_protocols TLSv1 TLSv1.1 TLSv1.2; # Dropping SSLv3, ref: POODLE
ssl_prefer_server_ciphers on;##
# Logging Settings
##access_log /var/log/nginx/access.log;
error_log /var/log/nginx/error.log;##
# Gzip Settings
##gzip_vary on;
gzip_proxied any;gzip_comp_level 6;
gzip_buffers 16 8k;
gzip_http_version 1.1;
gzip_types text/plain text/css application/json application/x-javascript text/xml application/xml application/xml+rss text/javascript;##
# Virtual Host Configs
##include /etc/nginx/conf.d/*.conf;
include /etc/nginx/sites-enabled/*;
}
#mail {
# # See sample authentication script at:
# # http://wiki.nginx.org/ImapAuthenticateWithApachePhpScript
#
# # auth_http localhost/auth.php;
# # pop3_capabilities "TOP" "USER";
# # imap_capabilities "IMAP4rev1" "UIDPLUS";
#
# server {
# listen localhost:110;
# protocol pop3;
# proxy on;
# }
#
# server {
# listen localhost:143;
# protocol imap;
# proxy on;
# }
#}4. PHP install
sudo apt-get -y install php7.3-fpm php7.3-mysql php7.3-curl php7.3-gd php7.3-intl php-pear php-imagick php7.3-imap php-memcache php7.3-pspell php7.3-recode php7.3-sqlite3 php7.3-tidy php7.3-xmlrpc php7.3-xsl php7.3-mbstring php-gettext php7.3-mysql php7.3-curl php7.3-gd php7.3-intl php-pear php-imagick php7.3-imap php-memcache php7.3-memcached php7.3-pspell php7.3-recode php7.3-sqlite3 php7.3-tidy php7.3-xmlrpc php7.3-xsl php7.3-mbstring php-gettext php7.3-fpm php7.3-cli php7.3-cgi php-bcmath php-zip php7.3-fpm php7.3-curl php7.3-gd php7.3-mysql php7.3-mbstring php7.3-zip php7.3-bcmath zip unzip4a.
sudo service nginx restart
sudo service php7.3-fpm restart
Froxlor install
There are two ways to get Froxlor. Stable (wget) and Beta Build (git / Master)Stable Version
1.
cd /var/www/html/1a.
sudo https://files.froxlor.org/releases/froxlor-latest.tar.gz && sudo tar xzfv froxlor-latest.tar.gzor
Git Version (Beta Version)
sudo git clone https://github.com/Froxlor/Froxlor.git && sudo chown -HR www-data:www-data Froxlor/sudo apt install composersu - www-data -s /bin/bashcd /var/www/html/Froxlor/1a(2). Composer install in your Froxlor directory
composer install --no-devSpoilercomposer install --no-dev
Loading composer repositories with package information
Updating dependencies
Package operations: 5 installs, 0 updates, 0 removals
- Installing psr/log (1.1.0): Loading from cache
- Installing monolog/monolog (1.24.0): Downloading (100%)
- Installing mso/idna-convert (v1.1.0): Downloading (100%)
- Installing phpmailer/phpmailer (v6.0.7): Downloading (100%)
- Installing robthree/twofactorauth (1.6.5): Downloading (100%)
Writing lock file
Generating autoload files
> if [ -f ./vendor/bin/phpcs ]; then "vendor/bin/phpcs" --config-set installed_paths vendor/phpcompatibility/php-compatibility ; fi
1b.
sudo chown -R www-data:www-data Froxlor/Set up Froxlor
2. Open Your Browser
2a.
http://your IP or Hostname/FroxlorInstall Froxlor finish
3d. Move userdata (Optional)
sudo mv /tmp/userdata.inc.php /var/www/html/Froxlor/lib/2c.
sudo rm /etc/nginx/site-enable/defaultdon't restart nginx!
Froxlor Settings
1. Cronjob
sudo nano /etc/cron.d/froxlorinsert
#
# Set PATH, otherwise restart-scripts won't find start-stop-daemon
#
PATH=/usr/local/sbin:/usr/local/bin:/sbin:/bin:/usr/sbin:/usr/bin
#
# Regular cron jobs for the froxlor package
#
# Please check that all following paths are correct
#
*/5 * * * *    root    /usr/bin/nice -n 5 /usr/bin/php -q /var/www/html/Froxlor/scripts/froxlor_master_cronjob.php
sudo chmod 0640 "/etc/cron.d/froxlor" sudo chown root:0 "/etc/cron.d/froxlor" sudo service cron restart2. Nginx PHP Backend
Settings > Webserver settings > Nginx PHP backendfrom 127.0.0.1:8888 to unix:/run/php/php7.3-fpm.sock
3.
sudo mkdir -p /var/customers/webs/ sudo mkdir -p /var/customers/logs/ sudo mkdir -p /var/customers/tmp sudo chmod 1777 /var/customers/tmp sudo service nginx restart4. IPs and Ports > Add IP/Port
2a(1), SSL Port
Wait 5min for Autimatic Start Froxlor's cronjob or start the cronjob manually
sudo php /var/www/html/Froxlor/scripts/froxlor_master_cronjob.php --force --debugOptional
PHP-FPM activate
1. User/Group add
sudo adduser froxlorlocal --disabled-password --no-create-home && sudo usermod -a -G www-data froxlorlocal2. libnss-extrausers install
sudo apt install nscd libnss-extrauserssudo mkdir -p /var/lib/extrausers sudo touch /var/lib/extrausers/{passwd,group,shadow}sudo mv "/etc/nsswitch.conf" "/etc/nsswitch.conf.frx.bak"sudo nano /etc/nsswitch.conf# Make sure that `passwd`, `group` and `shadow` have mysql in their lines # You should place mysql at the end, so that it is queried after the other mechanisams # passwd: compat extrausers group: compat extrausers shadow: compat extrausers hosts: files dns networks: files dns services: db files protocols: db files rpc: db files ethers: db files netmasks: files netgroup: files bootparams: files automount: files aliases: filessudo service nscd restart sudo nscd --invalidate=group2a. Settings > System settings > Activate > Use libnss-extrausers instead of libnss-mysql
3. Settings > PHP-FPM > Activated:
Change from NO to YES3a. PHP-FPM versions
Change > php-fpm restart command:service php7.3-fpm restartand
Configuration directory of php-fpm: > to
/etc/php/7.3/fpm/pool.d/3b. Settings > Froxlor VirtualHost settings > Activate > Enable PHP-FPM for the Froxlor vHost
3c.
sudo chown -HR froxlorlocal:froxlorlocal /var/www/html/FroxlorSSL / Let's Encrypt activate
1.
sudo apt install certbot1a.
sudo mkdir /etc/nginx/ssl && cd /etc/nginx/ssl1b. Create SSL File
sudo openssl req -x509 -nodes -days 365 -newkey rsa:2048 -keyout /etc/nginx/ssl/nginx.key -out /etc/nginx/ssl/nginx.crt1c.
sudo nano /etc/nginx/acme.confinsert
location /.well-known/acme-challenge { alias /var/www/html/Froxlor/.well-known/acme-challenge; location ~ /.well-known/acme-challenge/(.*) { default_type text/plain; } }2. Open your Froxlor Panel
Settings> SSL > Activated:
Change from NO to YES2a. Settings > SSL > Settings
Change your path from your certificate / KeyfilePath to the SSL certificate
insert/etc/nginx/ssl/nginx.crtPath to the SSL Keyfile
insert/etc/nginx/ssl/nginx.key2b. Settings > SSL > Settings
Activate > Enable Let's EncryptChange Path to the acme.conf snippet to >
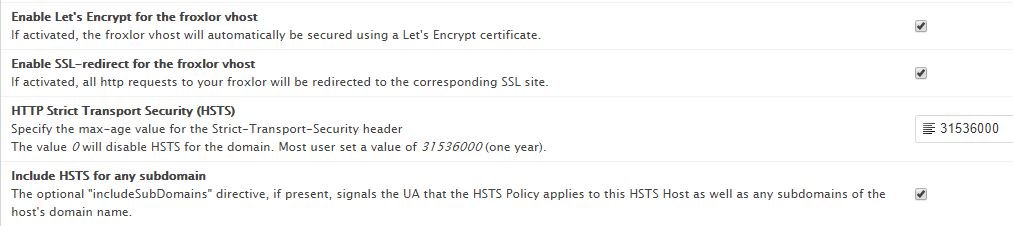
/etc/nginx/acme.conf2c. Activate on Settings > Froxlor VirtualHost settings
- Enable Let's Encrypt for the froxlor vhost
- Enable SSL-redirect for the froxlor vhost
- HTTP Strict Transport Security (HSTS)
- Include HSTS for any subdomain
2d. Activated HTTP2 Support on > Settings > Nginx


SSL Zertifikat wird im browser nicht erkannt
in German / Deutsch
Posted
also wenn das die ssl conf sein soll, ist da nichts mit LE. check mal bitte deine froxlor settings